

Part One Dockerizing the TypeScript React App with NodeJS Vs NGINX with WSL2 Alpine Linux on…


Part One: Dockerizing with NodeJS a TypeScript React Application secured by Keycloak using WSL2 and the distro Alpine Linux
Version 1.0
Date 2022/07/04
By Nicolas Barlatier
Important: this article can also be used for ANY React App of yours.
So please read on 😎
Introduction
This is the Part One : Dockerizing a TypeScript React App with Node using the Alpine Linux with Windows 10 through the WSL2.
Here we will focus on how to make a docker image from our React application Code base with NodeJS.
Why using Node ? With Node we will be able to use our VS Code IDE and work on our code from our Docker container which will reflect our code changes in real time !
Very convenient way of developping our React Application through our Docker image, don’t you think? :) 👌😎
The article will be divided in the following sections:
- How Getting our Development environment up: WSL 2 with the Linux Alpine distro then opening our React project with Windows VS Code IDE from Linux Alpine
- Explanation about why using Docker and how to create our React app Docker Image with Dockerfile
- How to build our React docker image with the Dockerfile from WSL2 Alpine Linux through the Windows Docker Desktop
- How to run our React Docker image with Node and synchronize it with any code change in VS Code
Phew! I am sure you will learn lot of stuff 😁👍
Maybe we will look like this poor dog at first ! 😂😁

But Don’t you worry, all we have to do is to follow the path from start to finish. Like a very long slope when we ski with the perfect image illustrating this:
You don’t have to read all the links but they help you to understand why we do the things this way.
In this article we will continue building our solution made of a React application secured by Keycloak and using the access JWT to reach for our REST Web API secured by JWT.
👀 Important: this article can also be used for any React App made with Javascript or TypeScript. So please read on 😎 I will highlight with these eyes 👀 when it is to tell you about the specifics 👀
To use the React App secured by Keycloak, please find the articles and github source code:
Part One: Installing Keycloak with Docker and Administration
Part Two: Securing a front-end React application
Part three: Securing the ASP.NET Core C# REST Web
GitHub Repository with React and Web API projects
- React Version 18.1.0 with TypeScript
- Web API with ASP.NET Core 5.0
[GitHub — nicoclau/reactwebapiaspnetcorekeycloak: React and REST Web API protected by Keycloak with…
React and REST Web API protected by Keycloak with Authorization Code Flow and JWT Token — GitHub …github.com](https://github.com/nicoclau/reactwebapiaspnetcorekeycloak "github.com/nicoclau/reactwebapiaspnetcoreke..")
The first commit contains:
- React SPA secured by the keycloak server
- Web API secured by the Access Token with the public key from the keycloak server used to validate it
The two applications don’t communicate yet, they are only secured.
The second commit contains:
- React SPA communicates with the Web API with the JWT Token and the CORS policy is handled
The third commit contains:
- the Docker file for React application
1 Prerequisites
I am on Windows 10 Pro. I can’t cover all the cases otherwise the article would be impossible to finish 😁
Now let’s see what we need!
1–1 Docker Desktop
First we download Docker Desktop on Windows 10.
Below the links for each env:
[Install Docker Desktop on Windows
Update to the Docker Desktop terms Commercial use of Docker Desktop in larger enterprises (more than 250 employees OR…docs.docker.com](https://docs.docker.com/desktop/windows/install/ "docs.docker.com/desktop/windows/install")
[Install Docker Desktop on Mac
Estimated reading time: 7 minutes Update to the Docker Desktop terms Commercial use of Docker Desktop in larger…docs.docker.com](https://docs.docker.com/desktop/mac/install/ "docs.docker.com/desktop/mac/install")
[Install Docker Desktop on Linux
Welcome to Docker Desktop for Linux. This page contains information about system requirements, download URLs, and…docs.docker.com](https://docs.docker.com/desktop/linux/install/ "docs.docker.com/desktop/linux/install")
Being on windows 10 Pro I used the first link.
Now we have Docker Desktop.
Before we go on, let’s remember how we built our React application in the previous articles.
I used NodeJs and npm to use the helper tool: Create React app:
λ node -v
v16.9.0λ npm -v
6.14.4
Below we can find the official link to download Node.js and npm:
[Node.js
Node.js® is a JavaScript runtime built on Chrome's V8 JavaScript engine.nodejs.org](https://nodejs.org/en/ "nodejs.org/en")
If you want to use the same version I used :
[Index of /dist/v16.9.0/
docs/ 07-Sep-2021 08:24 — win-x64/ 07-Sep-2021 07:51 — win-x86/ 07-Sep-2021 07:52 — SHASUMS256.txt 07-Sep-2021 10:06…nodejs.org](https://nodejs.org/dist/v16.9.0/ "nodejs.org/dist/v16.9.0")
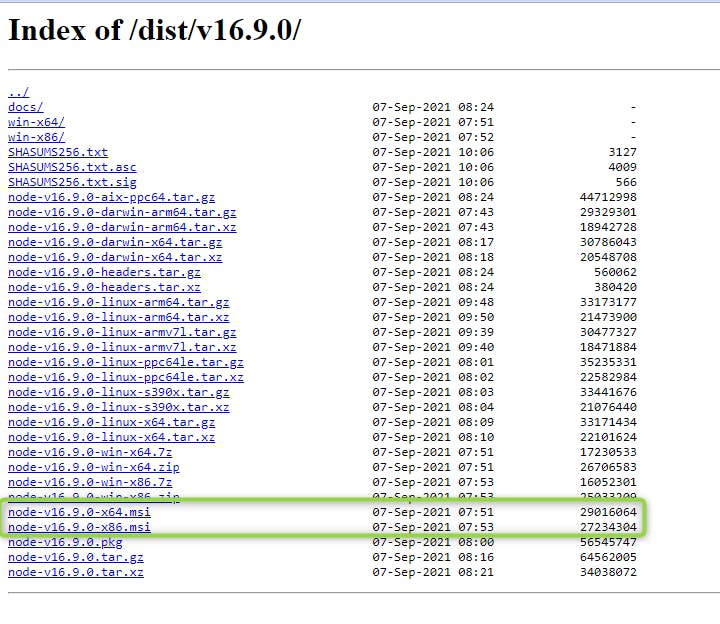
For windows we have the Node installers
The Latest LTS Version is : 16.15.1 (includes npm 8.11.0) (2022 July 03)
For now, we take note of the NodeJS version used in our React app dev which is 16.9.0 so we can add it in our Docker container later one on Linux.
We don’t need to install NodeJS on our Windows OS (that’s the beauty of Docker)
\==> We will use Linux Docker both to build and run the Container of our React application. <==
I am on Windows 10 but it is easy to work on Linux with WSL2 which stands for Windows Subsystem for Linux of course ! Moroever we can chose any Linux distro (or almost) 😊
1–2 WSL 2
Windows 10 is based on the Windows NT kernel which could host several subsystems from the beginning!
That’s how Microsoft thought well Linux is used more and more, why not providing Linux as a subsystem ? Brilliant Idea : here comes WSL2.
Below a summary about WSL 2:
WSL 2 is shipping a lightweight virtual machine with a complete Linux kernel with Fast boot times, a small resource footprint, and absolutely no VM configuration or management.
\=> A full Linux kernel is virtualized in this VM
\=>With a real Linux kernel, WSL 2 now offers full system call compatibilityWe will see this Linux kernel called : WSL2-Linux-Kernel
That way we use Linux all the way.
We will use Docker Desktop with WSL2 and the distro Alpine.
There are some steps to follow to enable WSL2 on Windows 10.
These two links will help you.
[How to install WSL2 (Windows Subsystem for Linux 2) on Windows 10 — Pureinfotech
WSL2 (Windows Subsystem for Linux version 2) is a new version of the architecture that allows you to use Linux on top…pureinfotech.com](https://pureinfotech.com/install-windows-subsystem-linux-2-windows-10/ "pureinfotech.com/install-windows-subsystem-..")
[Install WSL
This guide will show you how to install a Linux distribution (such as Ubuntu, OpenSUSE, Kali, Debian, Arch Linux, and…docs.microsoft.com](https://docs.microsoft.com/en-us/windows/wsl/install "docs.microsoft.com/en-us/windows/wsl/install")
I will explain how to use the Alpine Linux distro in the next section.
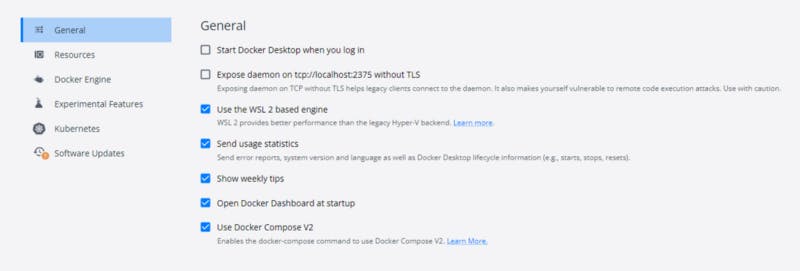
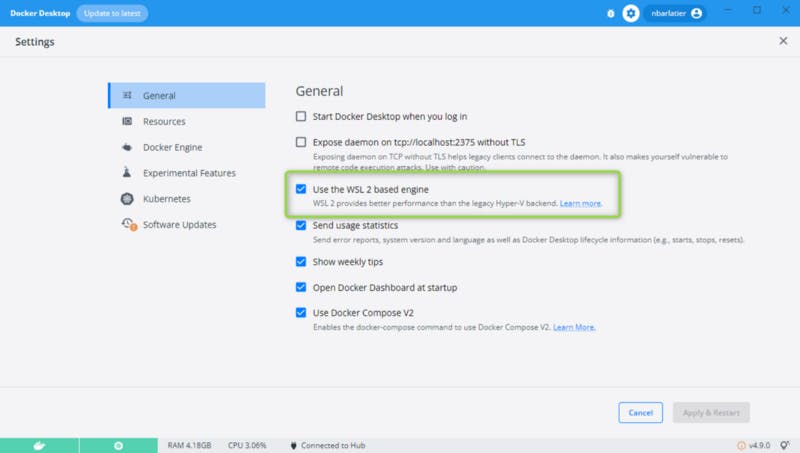
Now WSL 2 is also used by Docker Desktop! Let’s see why and how.
1–3 Docker Desktop WSL 2 backend
We will use Docker Deskop on Windows with the WS2 engine which works with better performance than the legacy Hyper-V backend.
Below we can see the option “Use the WSL 2 based engine” on.
Windows Subsystem for Linux (WSL) 2 introduces a significant architectural change as it is a full Linux kernel built by Microsoft, allowing Linux distributions to run without having to manage Virtual Machines
WSL 2 adds a full Linux environment including an automated sharing of the file systems, environment variables and network resources
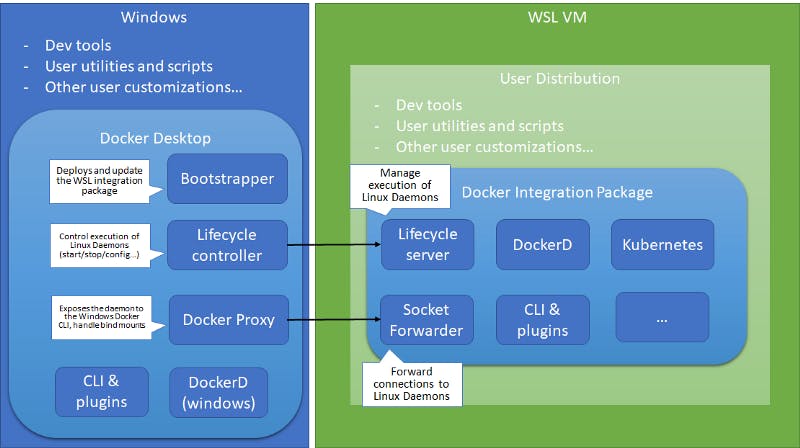
Below you can see the Docker Desktop using the WSL VM architecture:
You can find here a full article about the architecture:
[Using Docker in Windows for Linux Subsystem (WSL) 2
March 2, 2020 by Matt Hernandez, @fiveisprime Last June, the Docker team announced that they will be investing in…code.visualstudio.com](https://code.visualstudio.com/blogs/2020/03/02/docker-in-wsl2 "code.visualstudio.com/blogs/2020/03/02/dock..")
The daemon DockerD (which A self-sufficient runtime for containers) runs directly within WSL so there’s no need for the Hyper-V VM and all Linux containers run within the Linux userspace on Windows for improved performance and compatibility!
[Docker Desktop WSL 2 backend
Estimated reading time: 9 minutes Update to the Docker Desktop terms Commercial use of Docker Desktop in larger…docs.docker.com](https://docs.docker.com/desktop/windows/wsl/ "docs.docker.com/desktop/windows/wsl")
Below a more detailed article explaining the architecture used by Docker to integrate with WSL2:
[Seamless integration of Docker on Windows using WSL 2?
In this post I give a short summary of using Docker on Windows and a more detailed view into the newest Docker Desktop…blog.oio.de](https://blog.oio.de/2020/10/02/seamless-integration-of-docker-on-windows-using-wsl-2/ "blog.oio.de/2020/10/02/seamless-integration..")
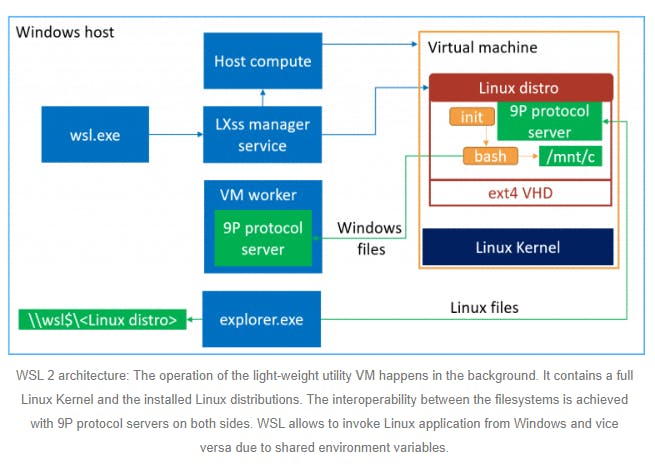
Below a diagram showing use the components used in WSL2 and the Linux Distro:
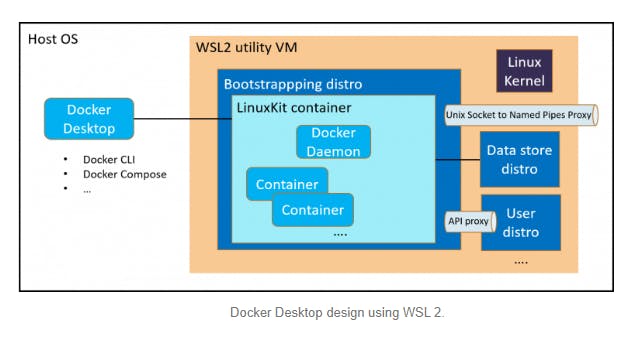
Below the diagram shows how Docker Desktop uses WSL2:
We can see that the distro (Alpine Linux) needs a proxy to communicate with the Docker runing in the VM (we will see how to enable this proxy)
The WSL file system also changed to an ext4 format on a virtual hard disk (VHD). This allows way faster File IO within the WSL 2 file system as there is no need any more for a translation layer
Sharing files/folders is fully maintained by use of a filesystem bridge using the 9P protocol, so WSL 2 sees all your Windows files and folders and you can see your Linux mounts from Windows.
There is now a NIC in WSL 2. We used our NAT network mode so that NIC is fully managed and coordinated by the host, but it does have its own IP
We will use Linux Alpine distribution in WSL because Alpine is the lightest distro
Small. Simple. Secure. Alpine Linux is a security-oriented, lightweight Linux distribution based on musl libc and busybox.
[Alpine Linux: The Lightweight Linux Distro Explained
Linux is fun, but sometimes you just hit a wall with current distros and want something different. Plus, it seems that…makeuseof.com](https://www.makeuseof.com/alpine-linux-explained/ "makeuseof.com/alpine-linux-explained")
Also Please read this link below, it explains in details why Alpine is the best choice today for working with docker as a Base image.
[The 3 Biggest Wins When Using Alpine as a Base Docker Image
It's no secret by now that Docker is heavily using Alpine as a base image for official Docker images. This movement…nickjanetakis.com](https://nickjanetakis.com/blog/the-3-biggest-wins-when-using-alpine-as-a-base-docker-image "nickjanetakis.com/blog/the-3-biggest-wins-w..")
Because we used the version 16.9.0 for Node in our project and the official container Node 16.9.0 uses Alpine 3.14, we will also use Alpine 3.14 for working from our Windows machine.
We use a PC with the architecture x86_64.
To find about the Computer Processor Architecture please run the following command:
λ uname -m
x86_64
If ‘uname’ is not recognized as an internal or external command,
operable program or batch file. Please use the tool cmder with Git for Window instead of the usual window cmd:
[Cmder | Console Emulator
Portable console emulator for Windows Cmder is a software package created out of pure frustration over the absence of…cmder.net](https://cmder.net/ "cmder.net")
To enjoy all the tools take the full version which incluses Git for Window
https://github.com/cmderdev/cmder/releases/download/v1.3.19/cmder.zip
We can find below a list of releases of the version 3.14.0 using this architecture x86_64:
[Index of /alpine/v3.14/releases/x86_64/
netboot/ 04-Apr-2022 16:09 - netboot-3.14.0/ 15-Jun-2021 14:36 - netboot-3.14.1/ 05-Aug-2021 12:27 - netboot-3.14.2/…dl-cdn.alpinelinux.org](https://dl-cdn.alpinelinux.org/alpine/v3.14/releases/x86_64/ "dl-cdn.alpinelinux.org/alpine/v3.14/release..")
MINI ROOT FILESYSTEM
Alpine is divided in different types
We will use the Mini Root FileSystem:
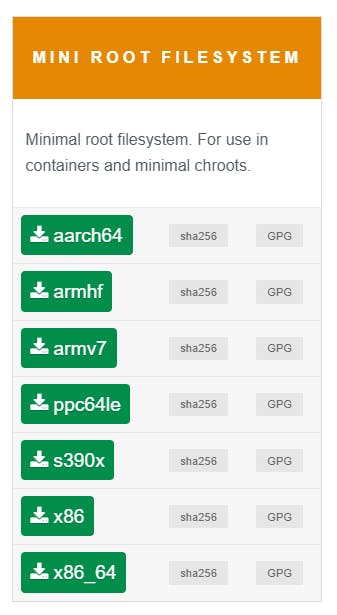
It is for use in containers and minimal chroots.
It should be enough!
As the book “More from Less” by Andrew McAfee said: we can do more with less ressources :)
First download the minimum version minirootfs Alpine for our architecture x86_64 from the list of releases of Alpine with the expected version and processor architecture:
https://dl-cdn.alpinelinux.org/alpine/v3.14/releases/x86_64/alpine-minirootfs-3.14.0-x86_64.tar.gz
We import the distribution in our WSL2 with the WSL cli command:
λ wsl --import AlpineMiniRootFS3.14-6 alpinewsl alpine-minirootfs-3.14.6-x86_64.tar.gz
we pass the arguments:
- the name of the distro (we call it AlpineMiniRootFS3.14–6)
- the name of directory where we store the distro (we created the directory alpinewsl)
- the alpine zipped file.
We check that our alpine distro AlpineMiniRootFS3.14–6 is listed:
λ wsl -l -v
NAME STATE VERSION
* docker-desktop Running 2
docker-desktop-data Running 2
AlpineMiniRootFS3.14-6 Stopped 2
Alpine distro is stopped and not selected by default (see the star * set to Ubuntu).
We can see Alpine uses WSL version 2 which has far better in performance with the File System and with the compatibility of Linux kernel system calls.
First Let’s make sure we can use our distro.
With the command:
wsl -d AlpineMiniRootFS3.14–6
We open WSL using the Alpine as a distro:
λ wsl -d AlpineMiniRootFS3.14-6
xxxx:/mnt/c/Tutorial#
xxxx:/mnt/c/Tutorial# uname -r
5.10.102.1-microsoft-standard-WSL2
xxxx:/mnt/c/Tutorial# cat /proc/version
Linux version 5.10.102.1-microsoft-standard-WSL2 (oe-user@oe-host) (x86_64-msft-linux-gcc (GCC) 9.3.0, GNU ld (GNU Binutils) 2.34.0.20200220) #1 SMP Wed Mar 2 00:30:59 UTC 2022
xxxx:/mnt/c/Tutorial# cat /etc/os-release
NAME="Alpine Linux"
ID=alpine
VERSION_ID=3.14.6
PRETTY_NAME="Alpine Linux v3.14"
HOME_URL="https://alpinelinux.org/"
BUG_REPORT_URL="https://bugs.alpinelinux.org/"
We can use Alpine from Windows :)
So we checked 2 points:
- We use the alpine Linux distro
- We use the microsoft linux kernel behind the scenes (5.10.102.1-microsoft-standard-WSL2)
Below the GitHube of the Linux Kernel used by WSL2 supported by Microsoft:
[GitHub - microsoft/WSL2-Linux-Kernel: The source for the Linux kernel used in Windows Subsystem for…
The WSL2-Linux-Kernel repo contains the kernel source code and configuration files for the WSL2 kernel. If you discover…github.com](https://github.com/microsoft/WSL2-Linux-Kernel "github.com/microsoft/WSL2-Linux-Kernel")
Now we are sure we can work with Alpine, let’s us make it our default distro with the following command
wsl -s AlpineMiniRootFS3.14–6
We get the results:
λ wsl -s AlpineMiniRootFS3.14-6
λ wsl -l -v
NAME STATE VERSION
* AlpineMiniRootFS3.14-6 Running 2
docker-desktop Running 2
docker-desktop-data Running 2
λ wsl
xxxx:/mnt/c/Tutorial# cat /etc/alpine-release
3.14.6
xxxx:/mnt/c/Tutorial# cat /etc/os-release
NAME="Alpine Linux"
ID=alpine
VERSION_ID=3.14.6
PRETTY_NAME="Alpine Linux v3.14"
HOME_URL="https://alpinelinux.org/"
BUG_REPORT_URL="https://bugs.alpinelinux.org/"
Now when we run just the command wsl without any argument, we use alpine :)
You can also see all the files of the alpine distro from Windows by opening:
\\wsl$\AlpineMiniRootFS3.14–6

Now we have WSL2 and Alpine Linux distro working together well.
Let’s work on Alpine Linux with VS Code!
1–4 Running VS Code from Alpine Linux
Before creating our Dockerfile within our Windows version VS Code, let’s see how to open VS Code from Alpine Linux. Yes you read it right, we can open Windows applications from the Linux.
Let’s see if we can really open our React project with VS Code from Alpine WSL2.
First we go into the project directory, your path must be different but it must start with /mnt/c/….
xxxx:/mnt/c/Tutorial/# cd /mnt/c/Tutorial/keycloak/reactwebapikeycloak/
xxxx:/mnt/c/Tutorial/keycloak/reactwebapikeycloak#
Let’s open our Visual Code from the location with the command with the dot . at the end
> code .
The dot says open me VS Code from the current directory.
xxxx:/mnt/c/Tutorial/keycloak/reactwebapikeycloak/# code .
WARNING: Ignoring https://dl-cdn.alpinelinux.org/alpine/v3.14/main: No such file or directory
WARNING: Ignoring https://dl-cdn.alpinelinux.org/alpine/v3.14/community: No such file or directory
libstdc++ is required to run the VSCode Server:
Please open an Alpine shell and run 'apk update && apk add libstdc++'
We notice that libstdc++ is missing and is required for the VSCode Server to open Visual Code from Alpine running through WSL2.
‼ Also Alpine Linux uses by default musl libc but we need to install glibcc to run Docker from the Alpine Linux distro in our terminal. ‼
We will install libstdc++ which depends on glibcc so we will install both of them in one go:

libstdc++ depends on libgcc
We see in Alpine libgcc was created from musl! It should be a wrapper around musl.
[Linux Prerequisites for Visual Studio Code Remote Development
Linux Prerequisites for VS Code Remote - SSH, Remote - Containers, and Remote - WSLcode.visualstudio.com](https://code.visualstudio.com/docs/remote/linux "code.visualstudio.com/docs/remote/linux")
In the article you see the prerequisites for working with Visual Studio Code with Remote development.
As a matter of fact our project and VS Code are stored in the windows filesystem. And we work on linux filesystem.
If you need to know more about Visual Studio Code Remote development:
[Visual Studio Code Remote Development
Visual Studio Code Remote Development allows you to use a container, remote machine, or the Windows Subsystem for Linux…code.visualstudio.com](https://code.visualstudio.com/docs/remote/remote-overview "code.visualstudio.com/docs/remote/remote-ov..")
Visual Studio Code Remote Development allows you to use a container, remote machine, or the Windows Subsystem for Linux (WSL) as a full-featured development environment.
Visual Studio Code Remote Development has prerequisites for the specific host / container / WSL distribution you will be connecting to.
Below the link detailing how to work from the WSL with VS Code:
[Work in Windows Subsystem for Linux with Visual Studio Code
This tutorial walks you through enabling Windows Subsystem for Linux (WSL) and running Visual Studio Code in WSL using…code.visualstudio.com](https://code.visualstudio.com/docs/remote/wsl-tutorial "code.visualstudio.com/docs/remote/wsl-tutor..")
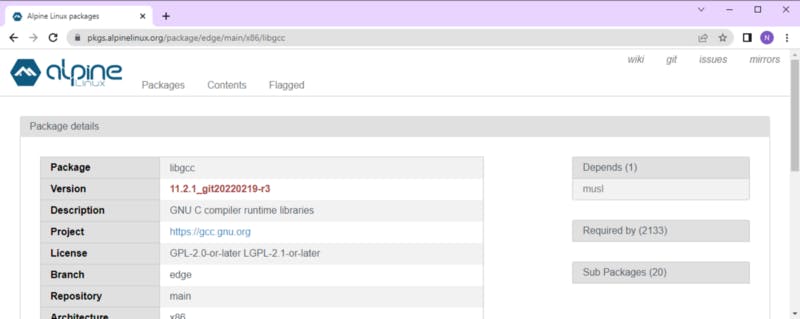
So let’s fix the problem. The libstdc++ package is available here:
Alpine Linux Packages
We can check it is available. Let’s install:
xxxx:/mnt/c/Tutorial/keycloak/reactwebapikeycloak# apk update && apk add libstdc++
fetch https://dl-cdn.alpinelinux.org/alpine/v3.14/main/x86_64/APKINDEX.tar.gz
fetch https://dl-cdn.alpinelinux.org/alpine/v3.14/community/x86_64/APKINDEX.tar.gz
v3.14.6-77-gc88baf16ee [https://dl-cdn.alpinelinux.org/alpine/v3.14/main]
v3.14.6-75-g95d33475fe [https://dl-cdn.alpinelinux.org/alpine/v3.14/community]
OK: 14961 distinct packages available
(1/2) Installing libgcc (10.3.1_git20210424-r2)
(2/2) Installing libstdc++ (10.3.1_git20210424-r2)
OK: 7 MiB in 16 packages
Easy-peasy right ?! Let’s check the version info about libstdc++
xxxx:/mnt/c/Tutorial/keycloak/reactwebapikeycloak/reactonlywithkeycloak/myapp# apk info libstdc++
libstdc++-10.3.1_git20210424-r2 description:
GNU C++ standard runtime library
libstdc++-10.3.1_git20210424-r2 webpage:
https://gcc.gnu.org
libstdc++-10.3.1_git20210424-r2 installed size:
1664 KiB
We can see it is older than on the website.
Let’s open again VS Code:
xxxx:/mnt/c/Tutorial/keycloak# code .
Installing VS Code Server for Alpine (dfd34e8260c270da74b5c2d86d61aee4b6d56977, linux-alpine)
Connecting to update.code.visualstudio.com (51.144.164.215:443)
Connecting to az764295.vo.msecnd.net (152.199.19.160:443)
saving to '/root/.vscode-server/bin/dfd34e8260c270da74b5c2d86d61aee4b6d56977-1656252937.tar.gz'
dfd34e8260c270da74b5 100% |**********************************************************************************************************************************************************************************************| 53.1M 0:00:00 ETA '/root/.vscode-server/bin/dfd34e8260c270da74b5c2d86d61aee4b6d56977-1656252937.tar.gz' saved
Unpacking: 100%
Unpacked 2341 files and folders to /root/.vscode-server/bin/dfd34e8260c270da74b5c2d86d61aee4b6d56977.
we can see that the VS Code Server for Alpine is installed at the very first launch.
We can see lot of files were installed and unpacked in /root/.vscode-server/
xxx:/mnt/c/Tutorial/keycloak/reactwebapikeycloak# ls -last /root/.vscode-server/
total 20
4 drwx------ 6 root root 4096 Jun 26 14:15 data
4 drwx------ 3 root root 4096 Jun 26 14:15 extensions
4 drwxr-xr-x 5 root root 4096 Jun 26 14:15 .
4 drwxr-xr-x 3 root root 4096 Jun 26 14:15 bin
4 drwx------ 5 root root 4096 Jun 26 14:15 ..
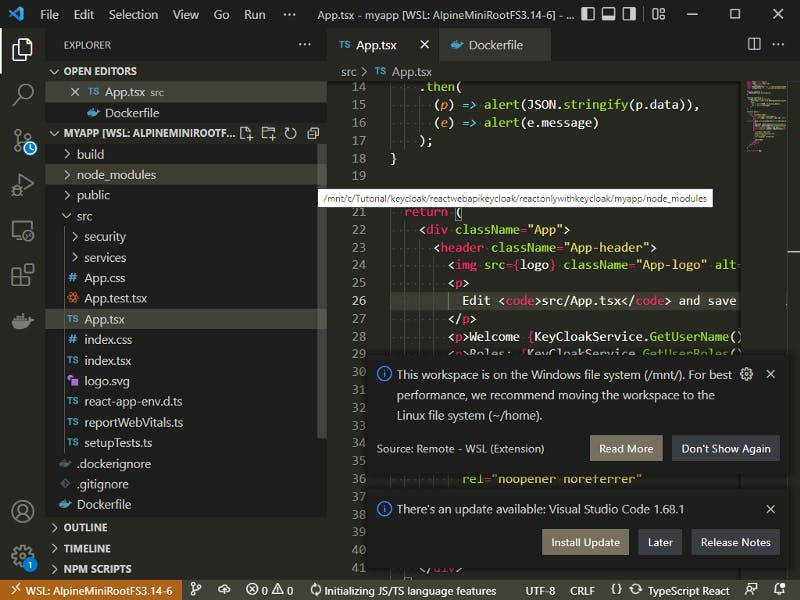
When we start again VS Code from Alpine:
VS Code opens smoothly :
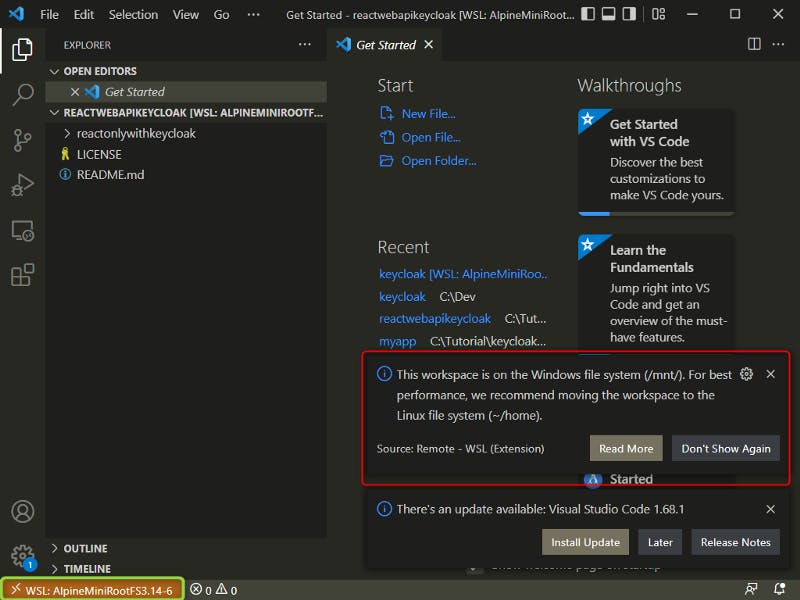
We notice Two things:
- VS Code shows we use WSL with Alpine (in green)
- VS Code started from the WSL detects that the workspace of our React app is on the Windows file system (detected by the root path /mnt/ for mount). It advices us for better performance to move this location to the Linux file system at the location ~/home
\==> We will move our project from the location into the Windows filesystem to the Alpine Linux filesystem location (the sysbol ~ means differents things on Linux: see https://www.baeldung.com/linux/tilde-bash)
We will do this step later on in the section : 2–1–1 Opening our React project in VS Code in the Linux filesystem
1–5 VS Code Extensions:
In VS Code we also need to install 2 extensions:
The extension Remote — WSL extension so we can easily debug our project in Linux filesystem from VS Code.
With VS Code and the Remote — WSL extension combined, VS Code’s UI runs on Windows, and all your commands, extensions, and even the terminal, run on Linux. You get the full VS Code experience, including autocomplete and debugging, powered by the tools and compilers installed on Linux.
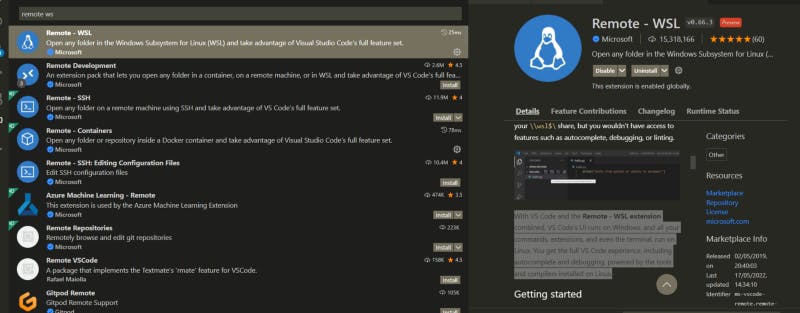
The extension Remote — Containers very useful to develop our container on Linux.
So at the end we have the following installed on our Alpine distro:
xxxx:/mnt/c/Tutorial#
musl
busybox
alpine-baselayout
alpine-keys
libcrypto1.1
libssl1.1
ca-certificates-bundle
libretls
ssl_client
zlib
apk-tools
scanelf
musl-utils
libc-utils
libgcc
libstdc++
ca-certificates
brotli-libs
nghttp2-libs
libcurl
expat
pcre2
git
docker-cli
c-ares
nodejs
npm
libblkid
blkid
libcap-ng
setpriv
libmount
libsmartcols
findmnt
mcookie
ncurses-terminfo-base
ncurses-libs
hexdump
lsblk
libuuid
libfdisk
sfdisk
cfdisk
partx
flock
logger
uuidgen
libeconf
util-linux
libseccomp
runc
containerd
libmnl
libnftnl-libs
iptables
ip6tables
tini-static
device-mapper-libs
docker-engine
docker
libbz2
libffi
gdbm
xz-libs
mpdecimal
readline
sqlite-libs
python3
py3-ordered-set
py3-appdirs
py3-parsing
py3-six
py3-packaging
py3-setuptools
py3-cached-property
py3-certifi
py3-chardet
py3-distro
dockerpy-creds
py3-cparser
py3-cffi
py3-idna
py3-asn1crypto
py3-cryptography
py3-ipaddress
py3-urllib3
py3-requests
py3-websocket-client
docker-py
py3-dockerpty
py3-docopt
py3-pyrsistent
py3-attrs
py3-jsonschema
py3-asn1
py3-bcrypt
py3-pynacl
py3-paramiko
py3-pysocks
py3-dotenv
yaml
py3-yaml
py3-texttable
docker-compose
That way you can check if you missed any tool if you have a problem.
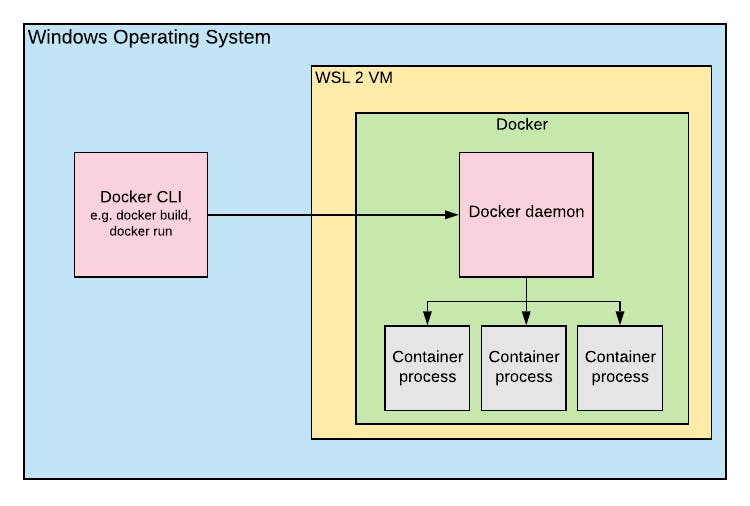
Here a schema to remember how Docker Destop works:
We have a CLI working on Windows, a VM which runs the Docker Daemon which handles the processes of our containers.
Why using Linux, because most of the production servers use linux. And ever more when we will use Kubernetes on-premises or the cloud!
Our applications can communicate and can be running on any local machine, server or VM, just make sure the machine/server/VM can reach the keycloak.
By the way, Keycloak server already runs with Docker !
You will need to run Keycloak first before running React and the Web Api.
Remember we used the docker image:

Docker Keycloak running
We will use later on the Docker Compose to make sure our applications run well in their docker instances and can communicate well through the network.
[Overview of Docker Compose
Looking for Compose file reference? Find the latest version here. Compose is a tool for defining and running…docs.docker.com](https://docs.docker.com/compose/ "docs.docker.com/compose")
2 Why using Docker ?
Now we can ask WHY using docker for our react and web api applications?
Why did we use docker to run our dev keycloak server also?
Good question!
Docker is the best way to pack all our application code, dependencies, configuration we need. They can run on any location having Docker installed and using the linux like our container images.
Docker containers start very fast.
They can be used easily in the cluster of different machines: VM, servers, clouds etc with an orchestrator like Kubernetes which will be our future subject.
2–1 Dockerizing our React application
I will not go back to the Docker basic, you should know what is Docker, Docker images and Docker containers.
Otherwise you can play this short intro of 20 minutes to get up to speed quickly:
How to get Started with Docker: Video 27 minutes
It is easier with Docker to bundle all our application code, support binaries an configuration together and only do that once
Remember our React application was utterly basic because our focus was not on the React dev but on how to secure it with Authentication and Authorization.
But We will make some improvement on it 😃✔
But first thing first, let’s add the Dockerfile at the root of our React solution in VS Code
2–1–1 Opening our React project in VS Code in the Linux filesystem:
We have two possibilities:
- opening our React project from the Windows filesystem with VS Code
- opening it directly from the Linux filesystem
It is better to use Linux. Let’s see why.
Here when we are in the Windows Filesystem from Linux (we can seet it with /mnt/c/….)
C:\Tutorial\keycloak\reactwebapikeycloak\reactonlywithkeycloak\myapp (main -> origin)
λ wsl
xxxx:/mnt/c/Tutorial/keycloak/reactwebapikeycloak/reactonlywithkeycloak/myapp# code .
xxxx:/mnt/c/Tutorial/keycloak/reactwebapikeycloak/reactonlywithkeycloak/myapp#
We see the warning:
It says This workspace is on the windows file system (/mnt). It is better to use our project in the Linux file system to have a perfect workflow.
You can move your react folder to the HOME directory of our distro:
xxx:/mnt/c/Tutorial/keycloak/reactwebapikeycloak/reactonlywithkeycloak/myapp# echo $HOME
/root
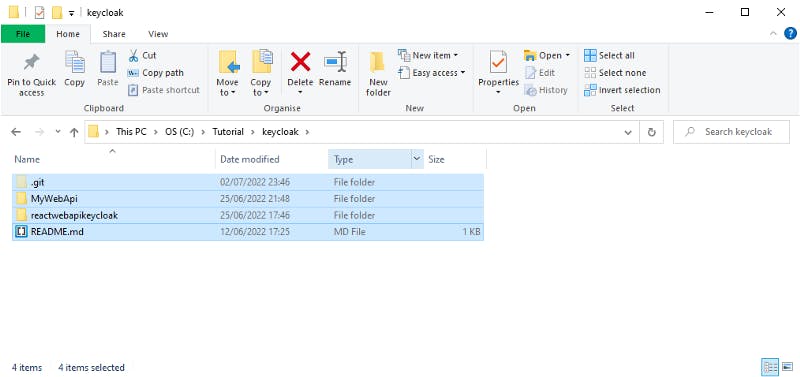
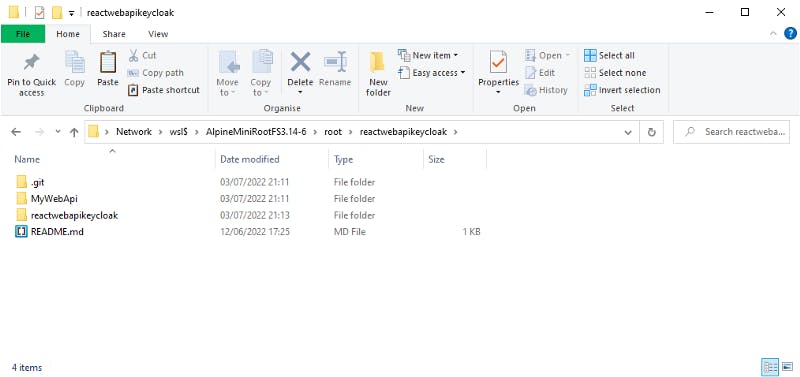
Copy and paste from C:\Tutorial\keycloak (delete before the node_module folder as it is massive with over 40 000 files and can be installed later with npm i)
To the following location:
\\wsl$\AlpineMiniRootFS3.14-6\root\reactwebapikeycloak
Notice the beginning of the path with \\wsl$
We should get:
Note let’s go there with our Linux terminal:
C:\Tutorial\keycloak\reactwebapikeycloak\reactonlywithkeycloak\myapp (main -> origin)
λ wsl
xxxx:/mnt/c/Tutorial/keycloak/reactwebapikeycloak/reactonlywithkeycloak/myapp# cd ~/reactwebapikeycloak/
xxxx:~/reactwebapikeycloak#
xxxx:~/reactwebapikeycloak# ls -last
total 24
4 drwxr-xr-x 3 root root 4096 Jul 3 19:13 reactwebapikeycloak
4 drwxr-xr-x 5 root root 4096 Jul 3 19:11 .
4 drwxr-xr-x 9 root root 4096 Jul 3 19:11 MyWebApi
4 drwxr-xr-x 7 root root 4096 Jul 3 19:11 .git
4 drwx------ 9 root root 4096 Jul 3 12:13 ..
4 -rw-r--r-- 1 root root 36 Jun 12 15:25 README.md
We have our two projects: React and ASP.NET Core Web API.
Let’s go to the folder “reactwebapikeycloak”:
xxxx:~/reactwebapikeycloak# cd reactwebapikeycloak/
xxxx:~/reactwebapikeycloak/reactwebapikeycloak# ls -last
total 52
4 drwxr-xr-x 3 root root 4096 Jul 3 19:13 .
4 drwxr-xr-x 3 root root 4096 Jul 3 19:13 reactonlywithkeycloak
4 drwxr-xr-x 5 root root 4096 Jul 3 19:11 ..
36 -rw-r--r-- 1 root root 35823 Jun 7 07:03 LICENSE
4 -rw-r--r-- 1 root root 160 Jun 7 07:03 README.md
Finally we reach for our source code:
xxxx:~/reactwebapikeycloak/reactwebapikeycloak# cd reactonlywithkeycloak/myapp/
xxxx:~/reactwebapikeycloak/reactwebapikeycloak/reactonlywithkeycloak/myapp# ls -last
total 548
4 drwxr-xr-x 5 root root 4096 Jul 3 19:13 .
4 drwxr-xr-x 3 root root 4096 Jul 3 19:13 ..
4 drwxr-xr-x 3 root root 4096 Jul 3 19:13 build
4 drwxr-xr-x 2 root root 4096 Jul 3 19:13 public
4 drwxr-xr-x 4 root root 4096 Jul 3 19:13 src
4 -rw-r--r-- 1 root root 1063 Jul 2 21:46 package.json
504 -rw-r--r-- 1 root root 512124 Jun 15 16:28 package-lock.json
4 -rw-r--r-- 1 root root 547 May 29 08:28 tsconfig.json
4 -rw-r--r-- 1 root root 310 Oct 26 1985 .gitignore
4 -rw-r--r-- 1 root root 2117 Oct 26 1985 README.md
Let’s open VS Code:
xxxx:~/reactwebapikeycloak/reactwebapikeycloak/reactonlywithkeycloak/myapp# Code .
xxxx:~/reactwebapikeycloak/reactwebapikeycloak/reactonlywithkeycloak/myapp#
We get:
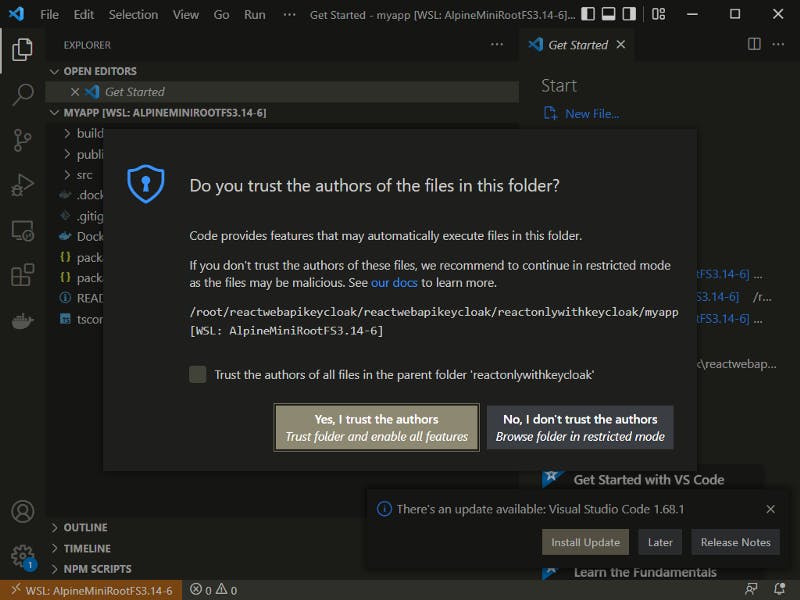
We can trust the author obviously 😁click on Yes!
We get the VS Code working smoothly YAY! 😎👍👌

Now we don’t see any warning we work in the Linux filesystem 100% with remote development with VS Code on Windows filesystem. How mad is it!
2–1–2 Creating our Dockerfile
Right click at the explorer root of our solution then click on New File
Let’s name the New File : Dockerfile
Notice we neeed to put the name Dockerfile with this correct spelling and case and without any file extension.
Why so ? So when we will use the Docker CLI it will detect the file without having us to give the name and extension.
Before we write our Dockerfile, we need another file called .dockerignore (like ignore in git) to avoid copying the npm dependencies when we build our docker image (toooo slow!)
We can add right away the following code in .dockerignore:
It basically tells the Docker CLI to ignore the files:
- Dockerfile
- .dockerignore
- .gitignore (we don’t use it for now)
- README.md
the folders:
- build (the directory containing the production built react app which we don’t have now)
- node_modules (the dependencies I told about)
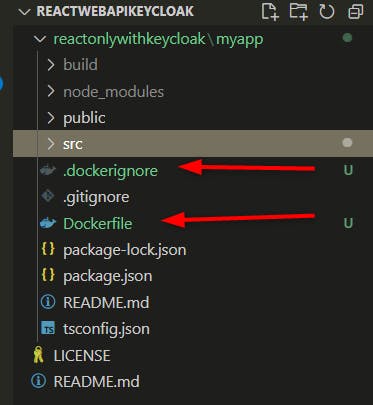
So we have:
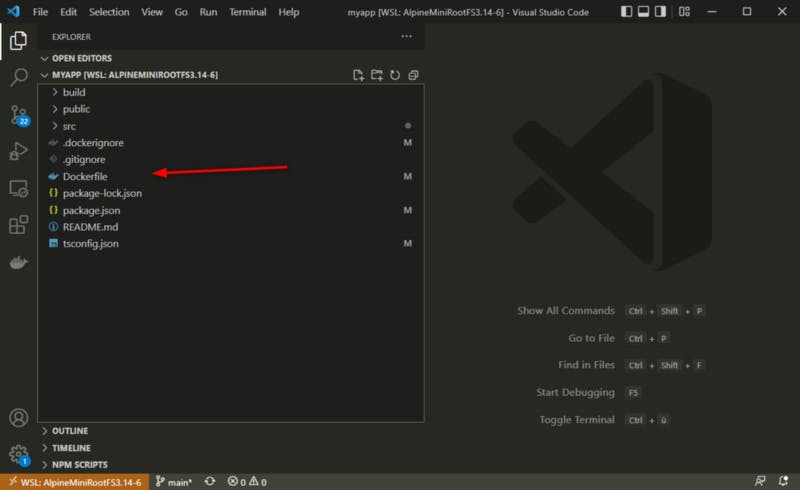
Notice our VS Code detects too the dockerfiles et .dockerignore files and we have automatically the Docker logo in front of the file name.
Now we are ready to work with our new Dockerfile!
But first we need to ask ourself: How do we host our React application in the Docker container?
How can we deploy our React application in the Docker container ?
We have two approachs:
- using the development server of NodeJS if we need to be able to develop our React App from within our container
- using the NGINX serving the production build of our React App.
Let’s start with the first option building our React application Container with NodeJS for development mode today!
2–2 Building the React Application Docker image with Node and the development server
Now we need one thing only : to find the correct docker image from which we will build our react application docker image.
We know we need NodeJs and npm.
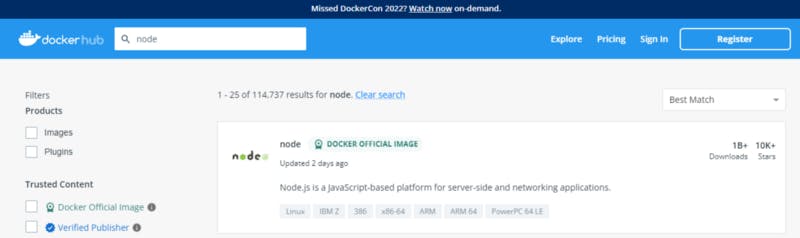
Let’s go to the official docker image hub and search “node” :
[Docker Hub Container Image Library | App Containerization
Edit descriptionhub.docker.com](https://hub.docker.com/ "hub.docker.com")
Let’s click on the official docker image of Node
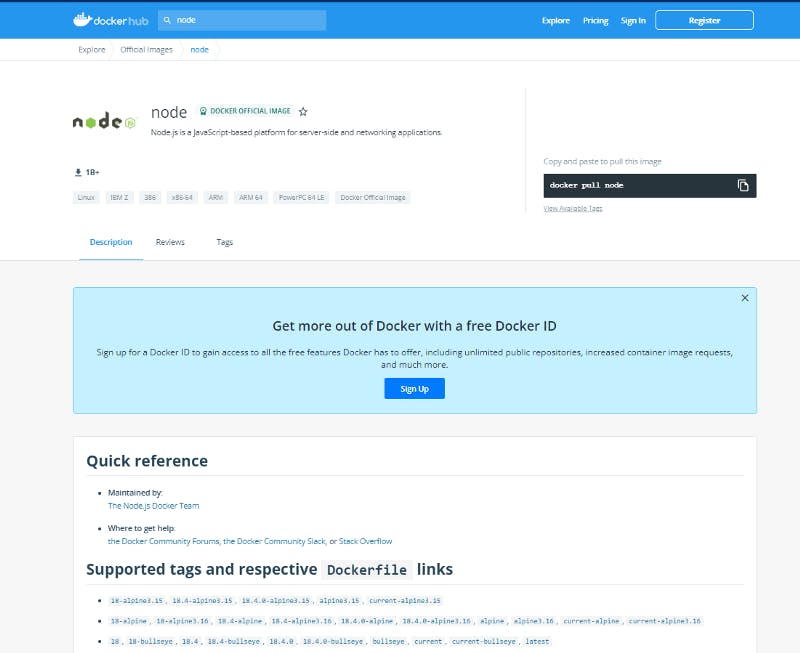
You can find a lots of differents version and tags.
Because of my machine uses Node 16.9, we could use the same version and tag.
With the link https://hub.docker.com/_/node?tab=tags&page=1&name=16.9 we can filter better
We have a lot of choices.
In the documentation there is explanation:
node:<version>This is the defacto image. If you are unsure about what your needs are, you probably want to use this one. It is designed to be used both as a throw away container (mount your source code and start the container to start your app), as well as the base to build other images off of.
Some of these tags may have names like bullseye, buster, or stretch in them. These are the suite code names for releases of Debian and indicate which release the image is based on. If your image needs to install any additional packages beyond what comes with the image, you’ll likely want to specify one of these explicitly to minimize breakage when there are new releases of Debian.
This tag is based off of
[buildpack-deps](https://hub.docker.com/_/buildpack-deps/).buildpack-depsis designed for the average user of Docker who has many images on their system. It, by design, has a large number of extremely common Debian packages. This reduces the number of packages that images that derive from it need to install, thus reducing the overall size of all images on your system.
node:<version>-alpineThis image is based on the popular Alpine Linux project, available in the
[alpine](https://hub.docker.com/_/alpine)official image. Alpine Linux is much smaller than most distribution base images (~5MB), and thus leads to much slimmer images in general.This variant is useful when final image size being as small as possible is your primary concern. The main caveat to note is that it does use musl libc instead of glibc and friends, so software will often run into issues depending on the depth of their libc requirements/assumptions. See this Hacker News comment thread for more discussion of the issues that might arise and some pro/con comparisons of using Alpine-based images.
To minimize image size, it’s uncommon for additional related tools (such as
gitorbash) to be included in Alpine-based images. Using this image as a base, add the things you need in your own Dockerfile (see the[alpine](https://hub.docker.com/_/alpine/)image description for examples of how to install packages if you are unfamiliar).
node:<version>-slimThis image does not contain the common packages contained in the default tag and only contains the minimal packages needed to run
node. Unless you are working in an environment where only thenodeimage will be deployed and you have space constraints, we highly recommend using the default image of this repository.
‼ Also Alpine Linux uses by default musl libc but we need to install glibcc to run Docker from the Alpine Linux distro in our terminal. ‼
It was installed with libstdc++ in the section Running VS Code from Alpine
We don’t have special needs, tools. So we could try the alpine variation as alpine is a very popular Linux.
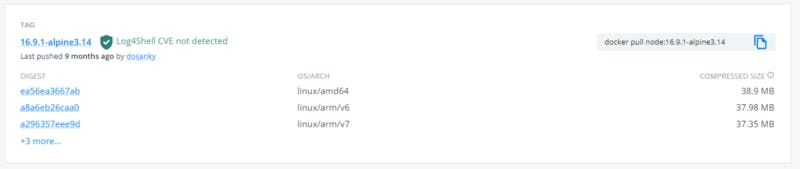
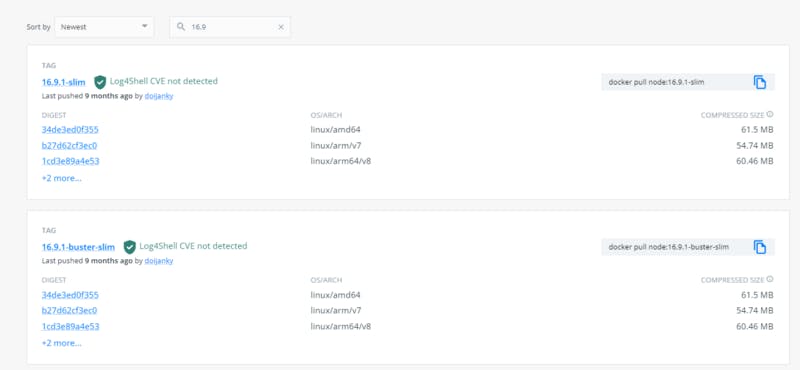
We will use the lastest version we can find of node 16.9.1 with alpine: the alpine version 3.14.
[Docker Hub
Edit descriptionhub.docker.com](https://hub.docker.com/layers/node/library/node/16.9.1-alpine3.14/images/sha256-c5d471d474fc25ed664f0da838eb4f7a08939e2e3f66655af95e9dca586f752a?context=explore "hub.docker.com/layers/node/library/node/16...")
Let’s try to see if we can pull this docker image:

it is at the location : docker.io/library/node:16.9.1-alpine3.14
Now let’s build step by step our Dockerfile.
Building the Dockerfile from Node with Alpine
Here’s the Dockerfile
Let’s see now the different commands used.
2–2–1 FROM
FROM node:16.9.1-alpine3.14
is our base docker image from which we will start building our own image
This base docker image is based itself from the base docker image of Alpine.
[Alpine - Official Image | Docker Hub
A minimal Docker image based on Alpine Linux with a complete package index and only 5 MB in size!hub.docker.com](https://hub.docker.com//alpine "hub.docker.com/alpine")
Let’s see how alpine 3.14 was created as a docker image:
[GitHub - alpinelinux/docker-alpine at v3.14
You can't perform that action at this time. You signed in with another tab or window. You signed out in another tab or…github.com](https://github.com/alpinelinux/docker-alpine/tree/v3.14 "github.com/alpinelinux/docker-alpine/tree/v..")
We can see several images depending on the architecture of our machine.
Let’s check on our Windows machine what is the architecture with the following linux command with WSL:
λ uname -m
x86_64
So We use the version docker-alpine/x86_64/
https://github.com/alpinelinux/docker-alpine/tree/v3.14/x86_64
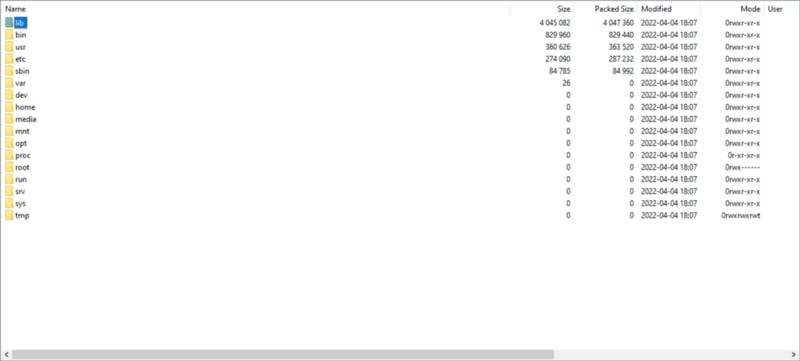
With the following Dockerfile which starts from scratch.
FROM scratch
ADD alpine-minirootfs-3.14.6-x86_64.tar.gz /
CMD ["/bin/sh"]
When ADD is used with a file tar zipped, Docker automatically unzips.
We have the following files :
We have to remember :
Linux images can run on Linux hosts and Windows hosts (using a Hyper-V Linux VM, so far), where host means a server or a VM.
Then the shell is started.
Then we have a shell running with Alpine Linux and using the linux kernel of our VM. We can check once we did the container and started it with the command:
/ # cat /etc/os-release
NAME="Alpine Linux"
ID=alpine
VERSION_ID=3.14.2
PRETTY_NAME="Alpine Linux v3.14"
HOME_URL="https://alpinelinux.org/"
BUG_REPORT_URL="https://bugs.alpinelinux.org/"
2–2–2 WORKDIR
WORKDIR /reactapp
sets the working directory for any
RUN,CMD,ENTRYPOINT,COPYandADDinstructions that follow it in theDockerfile.If theWORKDIR directorydoesn’t exist, it will be created even if it’s not used in any subsequentDockerfileinstruction.
That instruction is important, it will make sure we don’t overwrite any important files of the OS at the root!
The name of the directory can be any you like.
2–2–3 COPY
Then we have the COPY command:
The COPY instruction copies new files or directories from and adds them to the filesystem of the container at the path
COPY package.json ./
COPY package-lock.json ./
package-lock.json provides an immutable version of package.json, so that you can, for example, pull an older version of your code (which contains the package-lock.json) and end up with the same node_modules folder.
package-lock.json makes node_modules deterministic, by using the npm ci command.
Running npm ci on a package-lock.json will ALWAYS generate the SAME node_modules folder.
We tell the docker to copy the json files from our current location to the WORKDIR location.
These json files will help download all the dependencies of the react application.
Now we need to install the dependencies of our React application.
For this we need to run commands
2–2–4 RUN
The
RUNinstruction will execute any commands in a new layer on top of the current image and commit the results. The resulting committed image will be used for the next step in theDockerfile
Here we will need only one command: installing our dependencies in silent mode.
RUN npm install --silent
That’s all we need, now we can start the development server with
npm start
2–2–5 CMD
We will use a special instruction called CMD
CMD gives the executable to be un when a container is started from the image. Containers are designed for running specific tasks and processes, not for hosting operating systems.
We also have the command ENTRYPOINT.
CMD vs ENTRYPOINT
CMD is an instruction that is best to use if you need a default command which users can easily override.
On the other hand, ENTRYPOINT is preferred when you want to define a container with a specific executable. You cannot override the ENTRYPOINT when starting a container unless you add the **--entrypoint** flag.
we use the format : CMD [“executable”,”param1",”param2"]
Here we have:
CMD ["npm","start"]
We can Combine ENTRYPOINT with CMD if you need a container with a specified executable and a default parameter that can be modified easily.
That is it! With this dockerfile and .dockerignore we are ready to build our docker image which will be able to start our React application in development mode and that we can work with from our VS Code.
Now let’s see how to run Docker from our Alpine Linux in WSL2.
We have to check two points on Docker Desktop
2–3 Integrating Docker Desktop and WSL2 within the alpine Distro
We know Docker Destkop uses WSL2 by default now.
You can check this by looking at:
‼ Also Alpine Linux uses by default musl libc but we need to install glibcc to run Docker from the Alpine Linux distro in our terminal. ‼
It was installed with libstdc++ in the section Running VS Code from Alpine
Now we need to use our distro Alpine Linux to communicate to the Docker daemon:
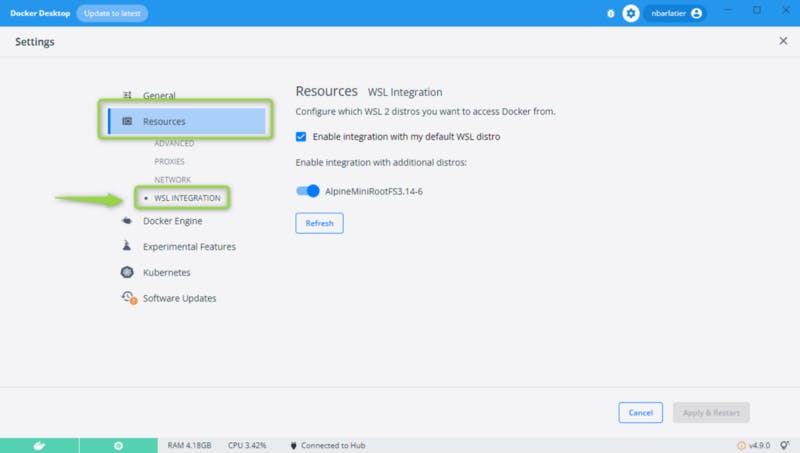
Make sure that “Enable integration with my default WSL distro” is enabled.
You can see the customized Alpine distro named “AlpineMiniRootFS3.14–6” in the list.
Once we can make sure we can reach Docker from our Alpine terminal:
We can run the com.docker.cli executable available on the Windows filesystem to make sure our distro can communicate:
C:\Tutorial\keycloak (main -> origin)
λ wsl
xxxx:/mnt/c/Tutorial/keycloak# com.docker.cli.exe images my*
REPOSITORY TAG IMAGE ID CREATED SIZE
myreact 1 05e93e4a4dcd 5 days ago 476MB
myreact latest 05e93e4a4dcd 5 days ago 476MB
We launched our Alpine with the command “wsl”.
We then called the docker cli : com.docker.cli.exe and used the command “images” to list our docker images.
We filter the docker images with my*
You can see the docker images I already made for our React application.
We are ready to build our React application Docker image from Alpine Linux on WSL 2.
Ok Now we need to install docker and docker compose on Alpine Linux.
We just need to install the docker cli because Docker Engine is already installed in the VM by Docker Desktop/
xxxx:/mnt/c/Tutorial# apk add docker-cli docker-compose
xxxx:/mnt/c/Tutorial# apk list docker-cli
docker-cli-20.10.11-r1 x86_64 {docker} (Apache-2.0) [installed]
Let’s check it works well now using Docker of the Alpine Linux:
xxxx:/mnt/c/Tutorial# docker -v
Docker version 20.10.11, build dea9396e184290f638ea873c76db7c80efd5a1d2
xxxx:/mnt/c/Tutorial# docker info
Client:
Context: default
Debug Mode: false
Plugins:
buildx: Docker Buildx (Docker Inc., v0.8.2)
compose: Docker Compose (Docker Inc., v2.6.0)
sbom: View the packaged-based Software Bill Of Materials (SBOM) for an image (Anchore Inc., 0.6.0)
scan: Docker Scan (Docker Inc., v0.17.0)
Server:
Containers: 36
Running: 35
Paused: 0
Stopped: 1
Images: 26
Server Version: 20.10.16
Storage Driver: overlay2
Backing Filesystem: extfs
Supports d_type: true
Native Overlay Diff: true
userxattr: false
Logging Driver: json-file
Cgroup Driver: cgroupfs
Cgroup Version: 1
Plugins:
Volume: local
Network: bridge host ipvlan macvlan null overlay
Log: awslogs fluentd gcplogs gelf journald json-file local logentries splunk syslog
Swarm: inactive
Runtimes: runc io.containerd.runc.v2 io.containerd.runtime.v1.linux
Default Runtime: runc
Init Binary: docker-init
containerd version: 212e8b6fa2f44b9c21b2798135fc6fb7c53efc16
runc version: v1.1.1-0-g52de29d
init version: de40ad0
Security Options:
seccomp
Profile: default
Kernel Version: 5.10.102.1-microsoft-standard-WSL2
Operating System: Docker Desktop
OSType: linux
Architecture: x86_64
CPUs: 4
Total Memory: 12.43GiB
Name: docker-desktop
ID: SCSM:65FB:UTGI:K4TM:PRE4:NWHR:3TQW:YDJX:TEBK:XXL7:NFFE:7DYU
Docker Root Dir: /var/lib/docker
Debug Mode: false
HTTP Proxy: http.docker.internal:3128
HTTPS Proxy: http.docker.internal:3128
No Proxy: hubproxy.docker.internal
Registry: https://index.docker.io/v1/
Labels:
Experimental: false
Insecure Registries:
hubproxy.docker.internal:5000
127.0.0.0/8
Live Restore Enabled: false
WARNING: No blkio throttle.read_bps_device support
WARNING: No blkio throttle.write_bps_device support
WARNING: No blkio throttle.read_iops_device support
WARNING: No blkio throttle.write_iops_device support
We can ignore the blkio warning which is used in metrics:
[Runtime metrics
You can use the docker stats command to live stream a container's runtime metrics. The command supports CPU, memory…docs.docker.com](https://docs.docker.com/config/containers/runmetrics/ "docs.docker.com/config/containers/runmetrics")
Great news we are ready, we have WSL2 working well with Docker Desktop and our Alpine Linux Distro can smoothly communicate with the Docker daemon. 😉
3 Build the Docker image of our React application
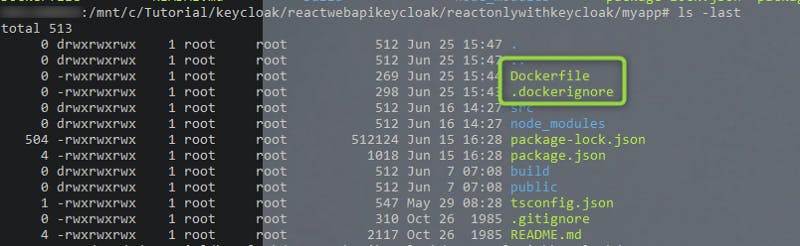
We go to our react project and make sure we have the two files :
Let’s build our docker image:
> docker build . -t myreact:1
We get the building:
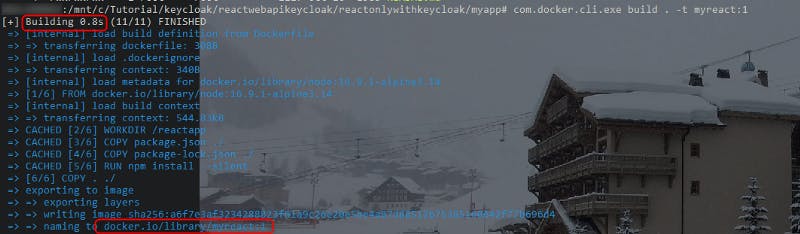
It was so fast because I already did it and Docker uses the cache when nothing changes in between.
Now let’s run our Docker container, below the complete reference about how to run our containers
[Docker run reference
Docker runs processes in isolated containers. A container is a process which runs on a host. The host may be local or…docs.docker.com](https://docs.docker.com/engine/reference/run/ "docs.docker.com/engine/reference/run")
xxxx:/mnt/c/Tutorial/keycloak/reactwebapikeycloak/reactonlywithkeycloak/myapp# docker run -d -p 3000:3000 myreact:1
With the docker CLI we used the command “run”
We added the options:
-d start a container in detached mode, we do this so our shell is not tied to the running container
-p 3000:3000 is used to expose the port of our running container to the port of our host. The first part before the separator : is the host port, the second part is the container port.
Then we give the docker image name with the tag: myreact with the tag 1.
We see the following:
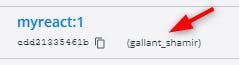
# docker run -d -p 3000:3000 myreact:1
cdd21335461b1449018689e0b0d3cab9b7af4996b421315a039c03c466265c06
You will get a different result as it is the id of the running container.
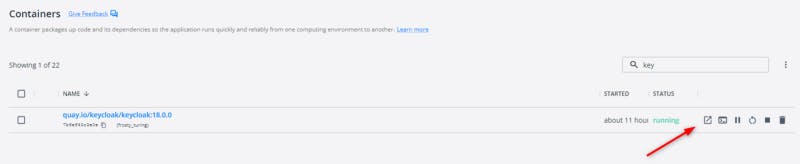
Let’s check the running container in Docker Desktop UI:
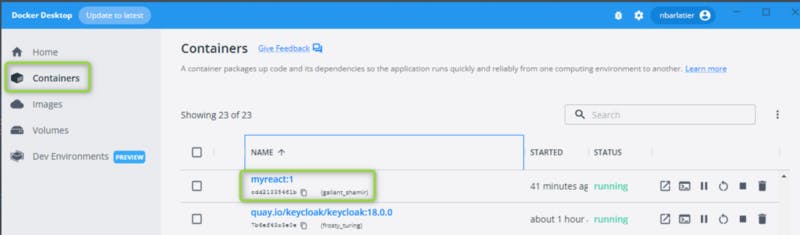
We can see it’s running smoothly, we can see the id and a random name for the container (we could provide the name).
Let’s see the logs:
Click on the random name (your will be different):
We will see the following logs:
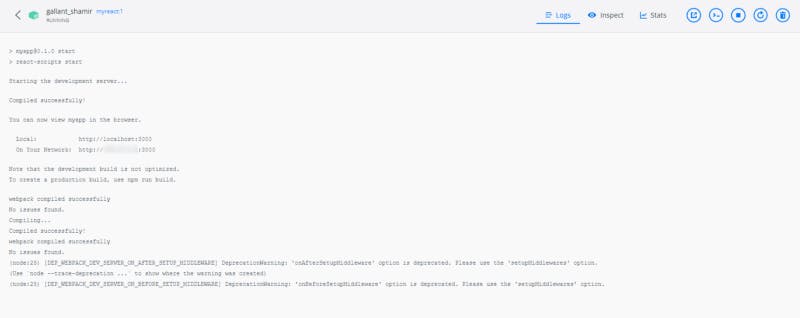
Cool we can see the npm started the development server properly.
You also see:
Note that the development build is not optimized.
To create a production build, use npm run build.
It will be part of the next article!
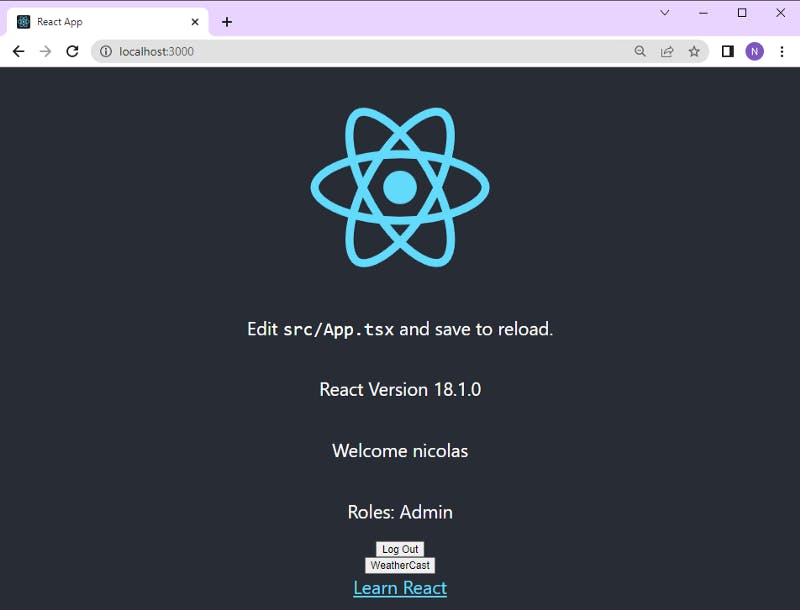
Now let’s open our react application by click on
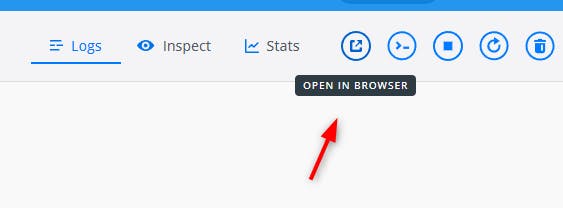
Cool we could reach for our application React!
👀 Normally if you created your React Application from scratch you should see your welcome page. 👀
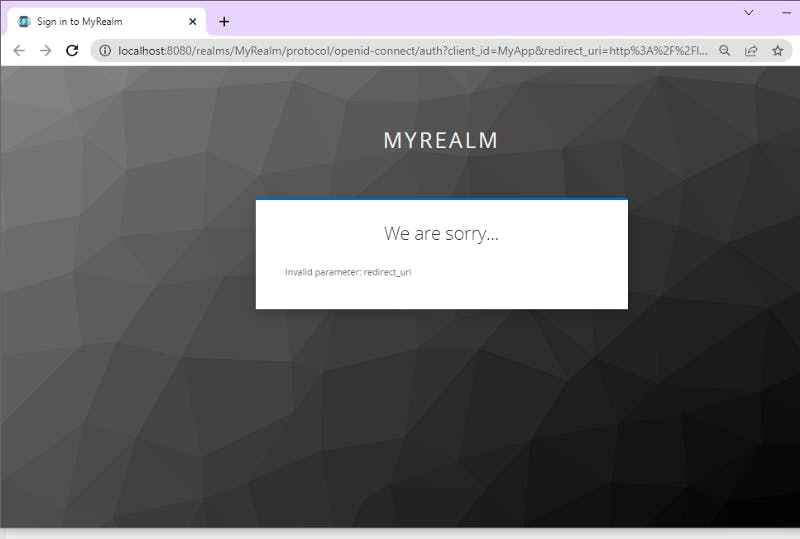
But here we see two things:
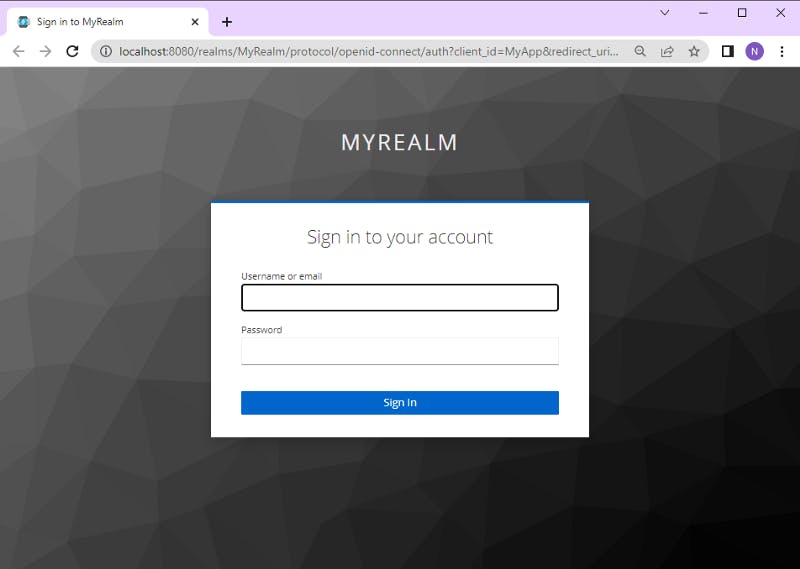
- we went from our React application at the uri: http://localhost:3000 (port set with the option -p) to the Keycloak server at the uri : http://localhost:8080
- Keycloak says it doesn’t recognise the React App uri where it is supposed to redirect to once the authentication passed (it is a security measure)
👀The next part is specific to our React application protected by Keycloak. 👀
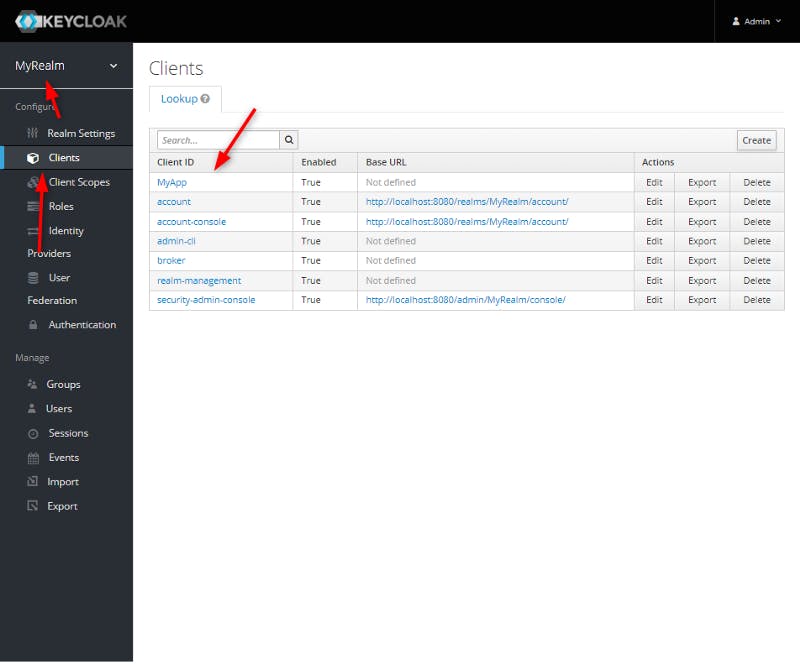
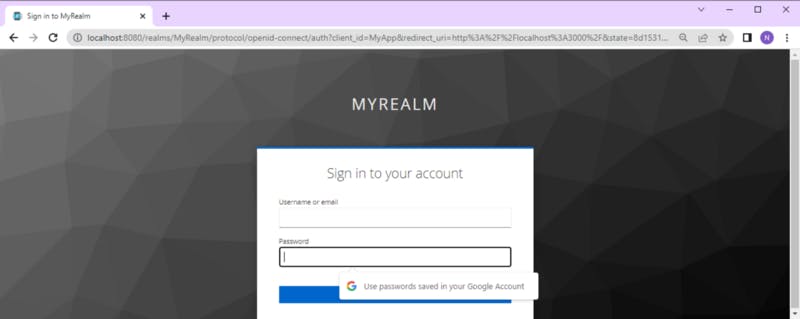
Let’s go back to our Keycloak UI running alson with Docker:
We open the browser and click on Administration Console

With the realm and client:
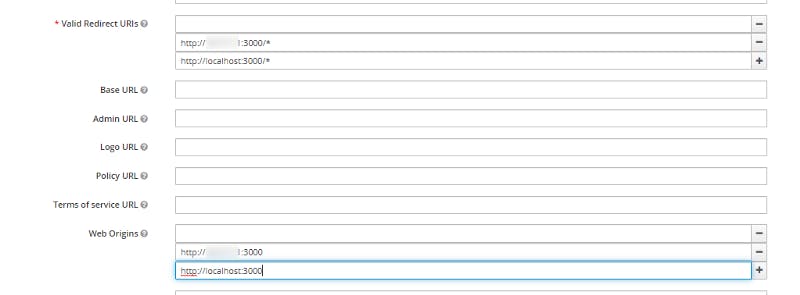
We have to add the uri of our React application running within the container in Valid Redirect URIs and Web Origins:
We get :
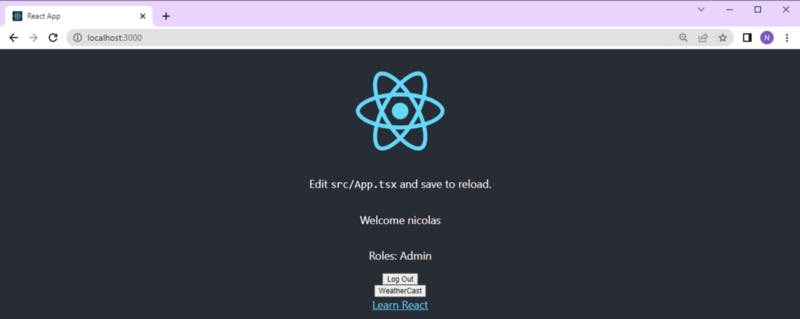
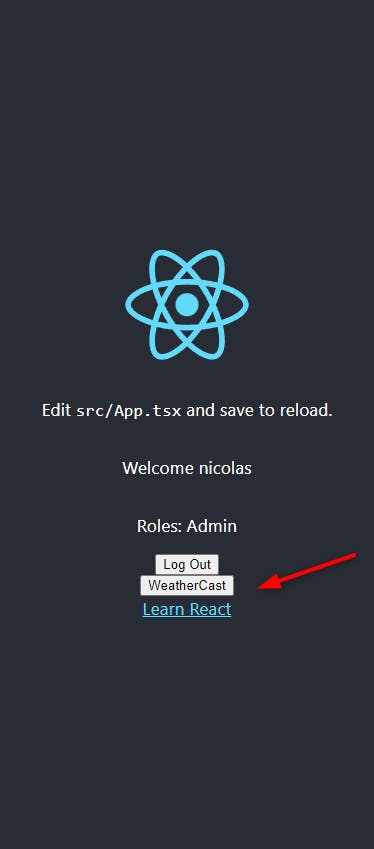
Once we saved and go back to our Reap application we get:
Once we are logged in we get the React welcome page:
If we click on WeatherCast we get the error:
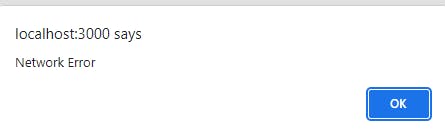
It is because our ASP.NET Core backend service is not running.
We will see how to make from the ASP.NET Core Web API service a Docker in the part 3 of the series!
Now how can we synchronise the local code within the linux filesystem with the running container ? With the help of Volume in Docker!
2–4 Debugging our running React Linux Container from VS Code and Alpine Linux
We will use the Volume to link the source code opened in our VS Code with the running container.
Before running the container, don’t forget to do :
xxxx:~/reactwebapikeycloak/reactwebapikeycloak/reactonlywithkeycloak/myapp# npm i
It will install all the necessary scripts and dependencies in our local linux filesystem.
If we don’t do that first, we will not be able to run the container as it will not find the necessary dependencies and script to start the server.
Let’s run the following command:
xxxx:~/reactwebapikeycloak/reactwebapikeycloak/reactonlywithkeycloak/myapp# docker run -it --rm -v $(pwd):/reactapp -p 3000:3000 myreact:1
We added the option -v linking our local react project with the workdir of the container.
$(pwd) is just used to say the current directory (which contains all the source code with which we work in VS Code)
Below the presentation of Volumes in Docker
[Use volumes
Volumes are the preferred mechanism for persisting data generated by and used by Docker containers. While bind mounts…docs.docker.com](https://docs.docker.com/storage/volumes/ "docs.docker.com/storage/volumes")
Below the complete reference about Volume with Docker
[docker volume
docker volume: Manage volumes. You can use subcommands to create, inspect, list, remove, or prune volumes.docs.docker.com](https://docs.docker.com/engine/reference/commandline/volume/ "docs.docker.com/engine/reference/commandlin..")
we get
Compiled successfully!
You can now view myapp in the browser.
Local: http://localhost:3000
On Your Network: http://xxxx:3000
Note that the development build is not optimized.
To create a production build, use npm run build.
webpack compiled successfully
No issues found.
Now let’s check what happens in the browser:
👀The next part is specific to our React application protected by Keycloak. 👀
If you use a simple react application you will directly see your welcome page.
we need to authenticate to Keycloak.
Our container is running good.

After authentication we see:
Ok we update our page from VS Code:
xxxx:~/reactwebapikeycloak/reactwebapikeycloak/reactonlywithkeycloak/myapp# code .
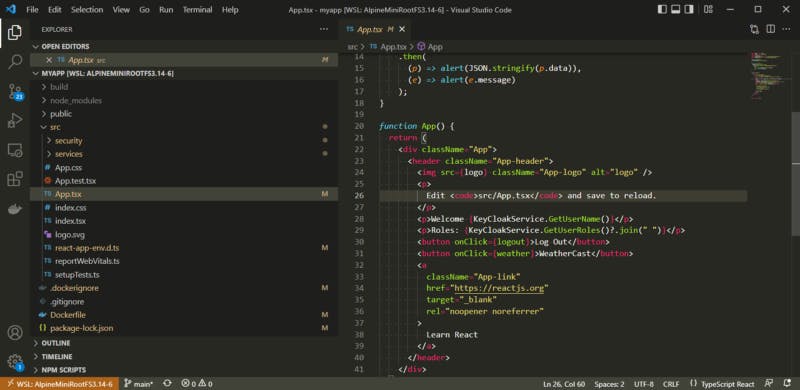
Let’s modify the message “Edit src/App.tsx and save to reload.” and see in real time the browser:
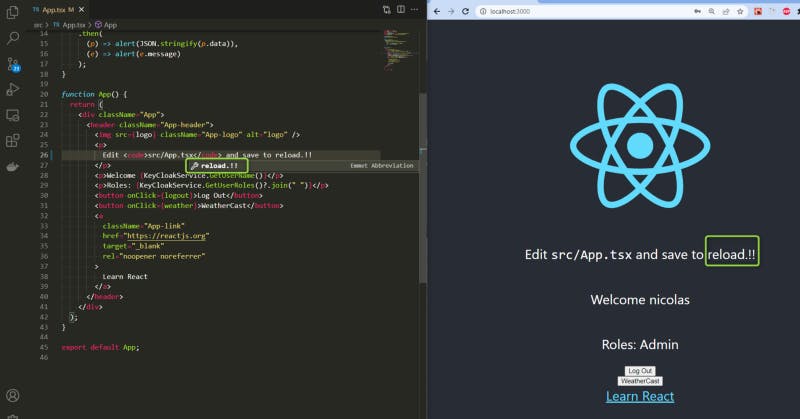
Yes we made it!
Now let’s try to debug our running container 😉
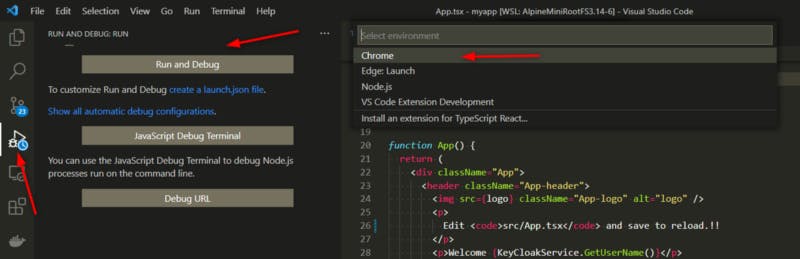
we get:
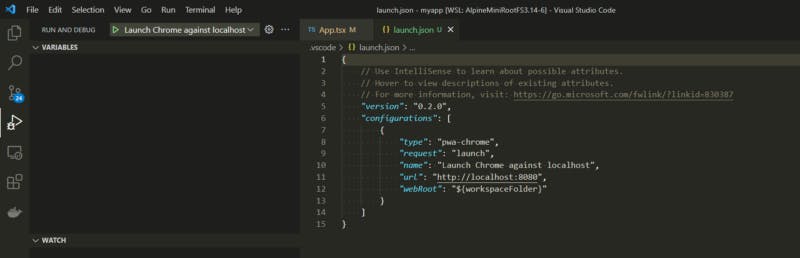
Let’s fix the url in the launch.json:
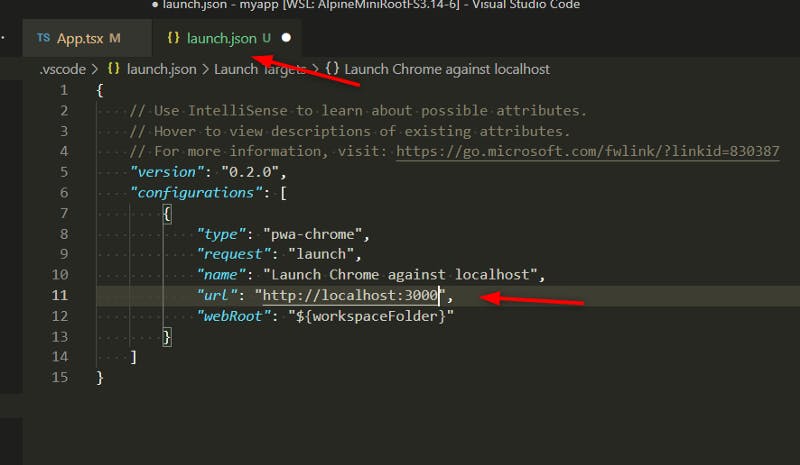
Then click on the green > (or press F5)
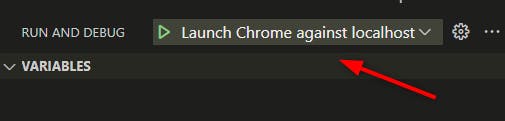
It will launch our chrome.
To debug, press F12 on chrome, go to the “Sources” tab, find the App.tsx then we can insert a breakpoint for example on clicking on the ligne 12:
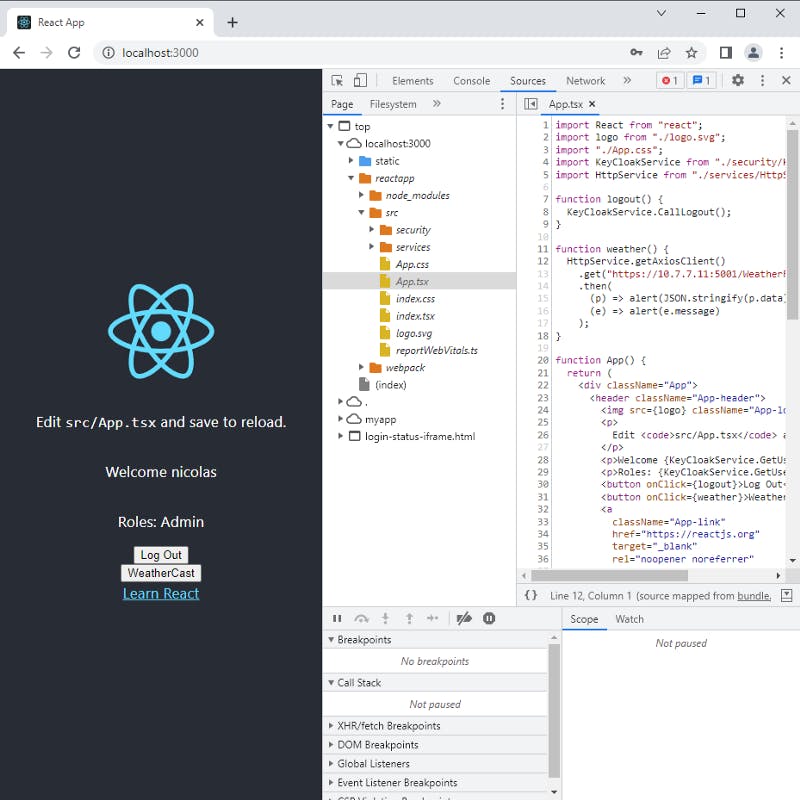
Let’s click on the button “WeatherCast”
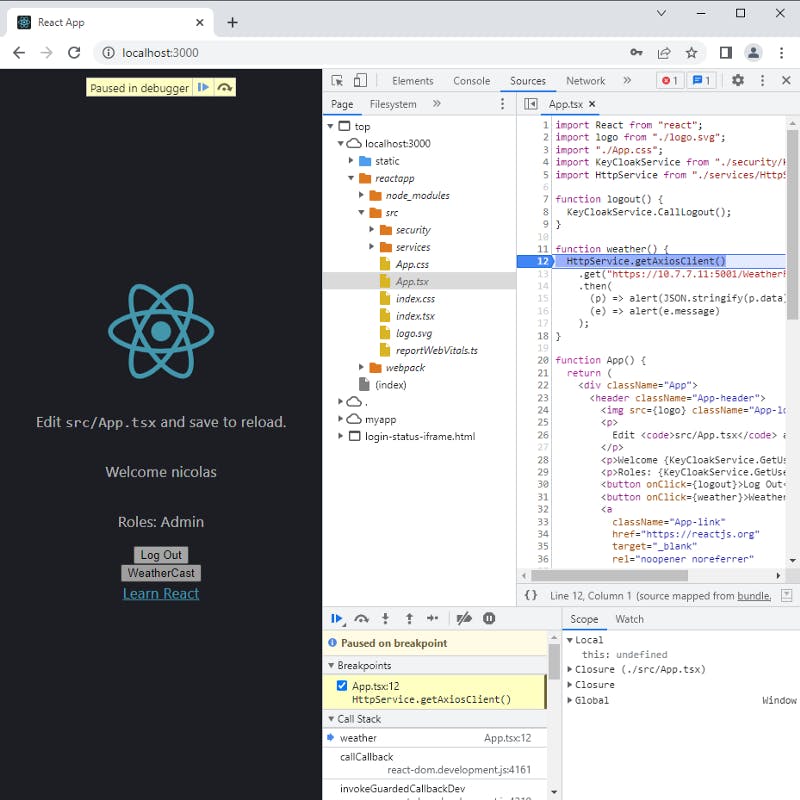
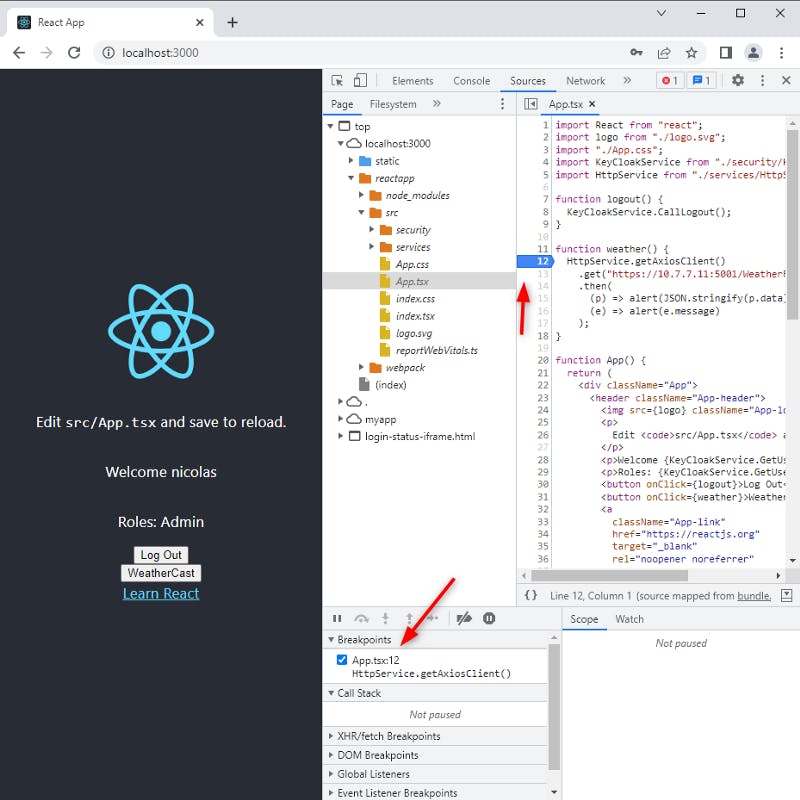
We can see it is paused on the ligne 12.
In VS Code we can see everything:
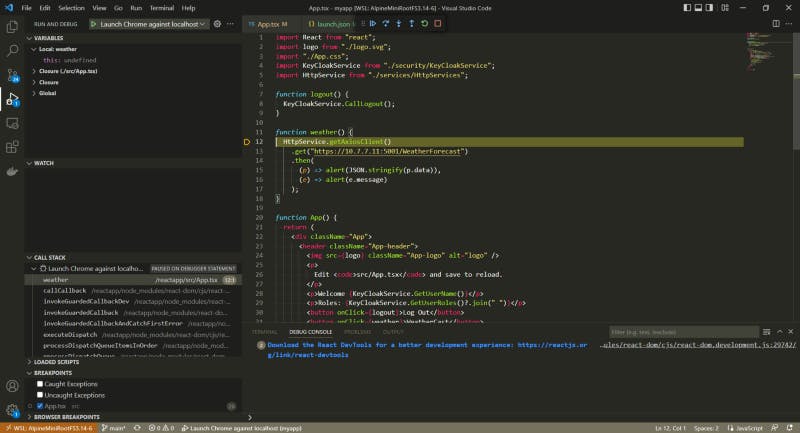
The variables, call stack, breakpoints etc.. and the ligne 12 in yellow
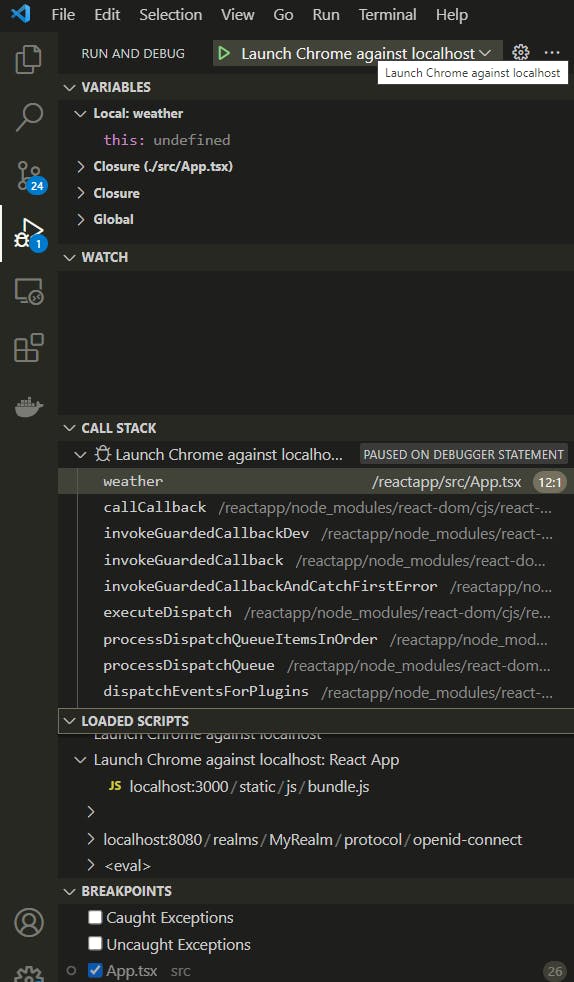
We can also see all the JS scripts loaded.
3 Conclusion
Thanks for having read the article I hope it will help you ✔👌
We saw how to work, build, develop even debug in VS Code our React application in a Linux container with Alpine Linux from Windows 10 Pro through the WSL2.
Next time we will see how to build, prepare our React application Linux container for production, with the help of NGNIX.
See you till next time, keep safe with Covid.
Be careful.
References
DOCKER
[Install Docker Desktop on Windows
Update to the Docker Desktop terms Commercial use of Docker Desktop in larger enterprises (more than 250 employees OR…docs.docker.com](https://docs.docker.com/desktop/windows/install/ "docs.docker.com/desktop/windows/install")
[Install Docker Desktop on Mac
Estimated reading time: 7 minutes Update to the Docker Desktop terms Commercial use of Docker Desktop in larger…docs.docker.com](https://docs.docker.com/desktop/mac/install/ "docs.docker.com/desktop/mac/install")
[Install Docker Desktop on Linux
Welcome to Docker Desktop for Linux. This page contains information about system requirements, download URLs, and…docs.docker.com](https://docs.docker.com/desktop/linux/install/ "docs.docker.com/desktop/linux/install")
NODE JS NPM
[Node.js
Node.js® is a JavaScript runtime built on Chrome’s V8 JavaScript engine.nodejs.org](https://nodejs.org/en/ "nodejs.org/en")
[Index of /dist/v16.9.0/
docs/ 07-Sep-2021 08:24 — win-x64/ 07-Sep-2021 07:51 — win-x86/ 07-Sep-2021 07:52 — SHASUMS256.txt 07-Sep-2021 10:06…nodejs.org](https://nodejs.org/dist/v16.9.0/ "nodejs.org/dist/v16.9.0")
[Linux Prerequisites for Visual Studio Code Remote Development
Linux Prerequisites for VS Code Remote - SSH, Remote - Containers, and Remote - WSLcode.visualstudio.com](https://code.visualstudio.com/docs/remote/linux "code.visualstudio.com/docs/remote/linux")
[How to install WSL2 (Windows Subsystem for Linux 2) on Windows 10 — Pureinfotech
WSL2 (Windows Subsystem for Linux version 2) is a new version of the architecture that allows you to use Linux on top…pureinfotech.com](https://pureinfotech.com/install-windows-subsystem-linux-2-windows-10/ "pureinfotech.com/install-windows-subsystem-..")
WSL
[Install WSL
This guide will show you how to install a Linux distribution (such as Ubuntu, OpenSUSE, Kali, Debian, Arch Linux, and…docs.microsoft.com](https://docs.microsoft.com/en-us/windows/wsl/install "docs.microsoft.com/en-us/windows/wsl/install")
[Using Docker in Windows for Linux Subsystem (WSL) 2
March 2, 2020 by Matt Hernandez, @fiveisprime Last June, the Docker team announced that they will be investing in…code.visualstudio.com](https://code.visualstudio.com/blogs/2020/03/02/docker-in-wsl2 "code.visualstudio.com/blogs/2020/03/02/dock..")
[Docker Desktop WSL 2 backend
Estimated reading time: 9 minutes Update to the Docker Desktop terms Commercial use of Docker Desktop in larger…docs.docker.com](https://docs.docker.com/desktop/windows/wsl/ "docs.docker.com/desktop/windows/wsl")
[Seamless integration of Docker on Windows using WSL 2?
In this post I give a short summary of using Docker on Windows and a more detailed view into the newest Docker Desktop…blog.oio.de](https://blog.oio.de/2020/10/02/seamless-integration-of-docker-on-windows-using-wsl-2/ "blog.oio.de/2020/10/02/seamless-integration..")
Linux Kernel of WSL2
[GitHub — microsoft/WSL2-Linux-Kernel: The source for the Linux kernel used in Windows Subsystem for…
The WSL2-Linux-Kernel repo contains the kernel source code and configuration files for the WSL2 kernel. If you discover…github.com](https://github.com/microsoft/WSL2-Linux-Kernel "github.com/microsoft/WSL2-Linux-Kernel")
ALPINE Linux
[Alpine Linux: The Lightweight Linux Distro Explained
Linux is fun, but sometimes you just hit a wall with current distros and want something different. Plus, it seems that…makeuseof.com](https://www.makeuseof.com/alpine-linux-explained/ "makeuseof.com/alpine-linux-explained")
[The 3 Biggest Wins When Using Alpine as a Base Docker Image
It’s no secret by now that Docker is heavily using Alpine as a base image for official Docker images. This movement…nickjanetakis.com](https://nickjanetakis.com/blog/the-3-biggest-wins-when-using-alpine-as-a-base-docker-image "nickjanetakis.com/blog/the-3-biggest-wins-w..")
CMDER
[Cmder | Console Emulator
Portable console emulator for Windows Cmder is a software package created out of pure frustration over the absence of…cmder.net](https://cmder.net/ "cmder.net")
VS Code and Remote Development
[Visual Studio Code Remote Development
Visual Studio Code Remote Development allows you to use a container, remote machine, or the Windows Subsystem for Linux…code.visualstudio.com](https://code.visualstudio.com/docs/remote/remote-overview "code.visualstudio.com/docs/remote/remote-ov..")
[Linux Prerequisites for Visual Studio Code Remote Development
Linux Prerequisites for VS Code Remote — SSH, Remote — Containers, and Remote — WSLcode.visualstudio.com](https://code.visualstudio.com/docs/remote/linux "code.visualstudio.com/docs/remote/linux")
[Work in Windows Subsystem for Linux with Visual Studio Code
This tutorial walks you through enabling Windows Subsystem for Linux (WSL) and running Visual Studio Code in WSL using…code.visualstudio.com](https://code.visualstudio.com/docs/remote/wsl-tutorial "code.visualstudio.com/docs/remote/wsl-tutor..")
DOCKER COMPOSE
[Overview of Docker Compose
Looking for Compose file reference? Find the latest version here. Compose is a tool for defining and running…docs.docker.com](https://docs.docker.com/compose/ "docs.docker.com/compose")
DOCKER
[Docker Hub Container Image Library | App Containerization
Edit descriptionhub.docker.com](https://hub.docker.com/ "hub.docker.com")
[docker build
Build an image from a Dockerfile Refer to the options section for an overview of available for this command. The docker…docs.docker.com](https://docs.docker.com/engine/reference/commandline/build/ "docs.docker.com/engine/reference/commandlin..")
[Docker run reference
Docker runs processes in isolated containers. A container is a process which runs on a host. The host may be local or…docs.docker.com](https://docs.docker.com/engine/reference/run/ "docs.docker.com/engine/reference/run")
ALPINE LINUX DOCKER IMAGE
[GitHub — alpinelinux/docker-alpine at v3.14
You can’t perform that action at this time. You signed in with another tab or window. You signed out in another tab or…github.com](https://github.com/alpinelinux/docker-alpine/tree/v3.14 "github.com/alpinelinux/docker-alpine/tree/v..")
Video (I watched it at the end of my article, I was happy to see Peter followed the same path, he used ubuntu instead of Alpine)